Air Conditioner Web Remote Control with Arudino
It’s done. It works. The internet of things has come to my little apartment in New York City. After about a week of tinkering, soldering, and piecing together bits of code from here and there, I can now load a web page from any browser, see the current temperature in my apartment (and a graph of the last 12 hours), and turn the AC unit on or off with the click of a button. This was accomplished with an Arduino, the open-source prototyping platform and the community of artists, techies and hackers behind it. I’ll show you what it looks like, then I’ll show you how I put it all together (my code is at the bottom if you want to try it yourself!
The End Results:
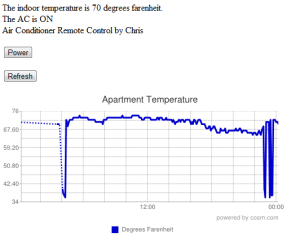
The screenshots below are from the web server that is running on the arduino. It simply presents the temperature reading, the ON/OFF state of the Air Conditioner, and a graph from cosm.com of the last 24 hours of temperature readings. The readings are pushed up to cosm.com every 10 seconds. (The screenshots have some wild temperature fluctuations because I was hacking a bit, but the steady temperature you see for most of the day is accurate. The AC was off all day, but it was cool and rainy here in New York City today)
This setup does require a dynamic dns name, and port forwarding on my router, which is not the sexiest way to do a remote control connection. It works, and I’ll leave the websockets and pusher.com connections for a later date.
To start with, I purchased the Sparkfun Inventor’s Kit, a great out-of-the-box kit for anyone who wants to start tinkering with an arduino. It includes an arduino UNO R3, a breadboard, and a plastic mounting panel that holds both the breadboard and the arduino in place. The kit has resistors, LEDs, and jumper wires, lots of sensors, potentiometers, a motor, pushbuttons, a servo, and plenty more. Best of all, it has a VERY easy to follow booklet of experiments to build, downloadable sketch code, and even circuit templates that show you exactly where to put each pin on the breadboard. I knew right away that I wanted to remote control my AC window unit, so I started out playing with temperature sensing.
Temperature Sensing
The Sparkfun kit comes with a TMP36 temperature sensor, which looks exactly like a transistor. Give it a voltage and ground (anywhere from 2.7 to 5.5 volts), and it will spit out voltage on its third pin. Regardless of the input voltage (as long as it is in range), the output voltage is converted into a Celcius temperature reading by subtracting 500mV and multiplying by 100. (Room temperature of 25° C will have a reading of 750mV.
This seems like a simple enough calculation to do, however the arduino’s analog pin don’t read voltage directly, they compare the voltage on the pin to a reference voltage (5v by default). When we do an analogRead() in a sketch, the arduino converts the analog voltage into a digital value from 0 to 1023. To get a temperature in degrees, we need to convert the digital reading back into volts or millivolts.
For example:
if analogRead(A0) = 153 ->
153/1024= .149 or 14.9% of the reference voltage ->
5 volts *.149 = .745 volts
To convert the voltage to temperature, we use the formula above:
.745 volts – .5 *100 = 24.5° C
The Sparkfun temperature sketch can be downloaded here, which spits out constant temperature readings via the arduino’s serial monitor.
I purchased the Arduino Ethernet Shield at this point to have my device start talking to the internet!
Cosm.com, formerly pachube
View the cosm feed for this project, showing real-time temperature data from the Arduino.
Once I knew how to read the temperature sensor and had my ethernet sheild in place, I started looking at Cosm.com to log the data and make fancy graphs on the fly. Cosm.com has a great arduino tutorial ready to go. All you need to do is sign up for an account, copy their code, paste in an API key and feed ID, and tell the arduino what data you’d like to send.
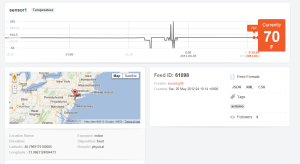 Cosm has a great API that will let you integrate your data into other apps, but for my purposes, the built-in graph builder worked just fine.
Remote Control
The next step was to figure out remote control. I originally wanted to find a solution that could use websockets and a remote server so that I wouldn’t have to open a port on my firewall, but I found these to be beyond my capabilities, at least right now. Cosm had a tutorial for internet control, but it was not real time (the arduino would log into a control feed at regular intervals and download a string of numbers that held values for pin settings.
I ended up finding some simple webserver code that switched an LED on and off using the arduino’s digital outputs and an HTML form. The example had radio buttons, one for on, and one for off, and a submit button. It simply added ?status=0 or ?status=1 to the URL, then read the results and turned the output pin on or off.
I tweaked this web form a bit to pulse a pin on for 500 milliseconds, and got rid of the radio buttons and replaced them with a hidden form field that would pass “status=1? and reload the page.
I tested this out with an LED, and it worked without a charm. The next step was to hack my way into the Air Conditioner.
Hacking the AC
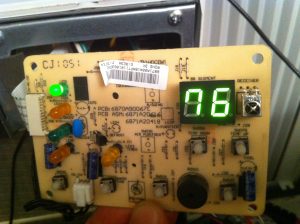
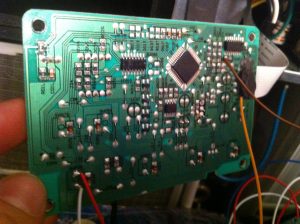
All that is necessary to turn the AC on and off is to mimic the action of the power switch, which closes a circuit for a moment and tells the processer in the AC unit that it should turn on (or off). We need to accomplish this using a digital output pin on the arduino. A transistor or a reed relay would fit the bill for this task, and I decided to go with the option that had no moving parts. An NPN transistor with its base connected to my arduino output pin, and it’s collector and emitter connected directly to the power switch on the AC will mimic the pushing of the button when the output goes high.
When the transistor method didn’t work, I did some googling and learned that unless I had an optocoupler in the circuit, I would need to connect the grounds of the arduino and the AC circuit board together. I found a good ground spot with a huge solder pad, and my web-enabled switch was live!Finishing TouchesThe last step was to figure out when the unit was on or off, so it could be displayed. On advice from my little brother the robotics engineer, I used the power LED. For whatever reason, it had a voltage in both the ON and OFF states, but they were different enough to tell the two states apart. I connected one side of the LED directly to an analog input on the arduino, and set the threshold at 900 (remember, that’s a digital representation of the actual voltage). If the pin reads above 900, the AC is off. If it reads below, the unit is on… update HTML accordingly.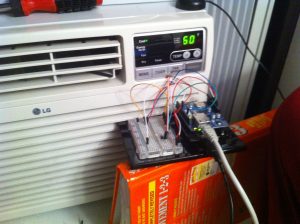 Tying it all together, I had to combine my functioning webserver code with the cosm.com uploader code, embed a graph from cosm.com (it’s simply a dynamically generated image, so you can easily paste an <img> tag.), and add a refresh button so I could get new temperature readings and a new graph without turning the unit on and off again.Now, before I get on the subway to head home, I can pull out my iPhone and turn on the AC… the apartment will be nice and cool when I arrive. I hope this helps anyone else who wants to do home automation with Arduinos!

Leave a Reply