Hexbug IR Remote Control using Arduino and Pusher.com
After success with the Arduino Air Conditioner Remote Control, and getting Pusher authentication and client events working from an Arduino, I was in search of something a bit more fun and interactive to connect to the web. I looked at LEDs, little electric fans, a pocket SIMON game, and few others before choosing an off-the-shelf IR controllable Hexbug.  For about $25 at radio shack, the Hexbug spider comes with a teeny little remote control, and can be controlled with absolutely no soldering, wires, or electronics on the device… all we must do is replicate the commands!
The Plan
The setup would be similar to an internet dog feeder I built a few years ago. Here are a few peices of the puzzle:
-An Arduino with Ethernet Shield, IR sensor and IR LED – The Arduino would first be used to read the IR commands from the
HexBug Remote. A new program would then communicate with Pusher.com and transmit the approprite IR commands.
-Pusher.com is the simplest way to get real-time commands into an Arduino, hands down. Pusher serves as an easy-to-connect-to
relay for our commands (trigger events), receiving them from our server, and sending them to the Arduino.
-Our webserver will use Pusher.com’s php server library to send the commands. We set up a php script for each command
(forward, backward, left, right), and then a simple front page with AJAX buttons that call each script.
-A webcam server for Windows feeds video from a cheap USB webcam mounted above my desk looking downward at the Hexbug. A network camera would also serve this purpose well, but would cost a lot more.
Learning the codes
http://learn.adafruit.com/ir-sensor/overview
Adafruit has a great tutorial explaining all of the cool things you can do with IR on Arudinos. Download their sketch and wire up an IR receiver, and you’ll ready to read codes in just a few minutes.
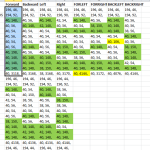
 Open the serial monitor and the adafruit sketch will start spitting out the codes it receives. From here we need to do a little bit of analysis to figure out what we’re looking at. The IR signals that are emitted when you push a button on a remote control are usually repeating sequences of timed on/off periods from the IR LED. After taking a quick look at the output, we see that the codes for this Hexbug appear to repeat after 13 on/off periods.
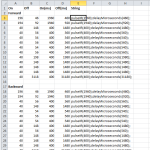
I take the output from the IR reader for each of the 4 basic commands (forward, backward, left right), and paste them all into Excel to make things a bit clearer. The hexbug is able to simultaneously turn and move forward/backwards, so there are 4 additional codes for these combination signals. I’m not as concerned with these right now, but they may come into play in future versions of the project.

The output from adafruit’s IR reader contains On/Off sequences in 10s of microseconds, so we need to convert these to microseconds, then concatenate each sequence into a string that can be used in an Arduino sketch. pulseIR() is a function from adafruit’s intervalometer example that pulses an IR led for the supplied number of microseconds. delayMicroseconds() simply keeps it off for the appropriate amount of time.
I set up a quick adaptation of adafruit’s intervalometer sketch to cycle through the codes and see if I got a response from each one. They worked! Now let’s get this thing connected to the internet.
Arduino Pusher Client
Kevin Rohling’s Arduino Pusher Client Library comes with an example called “robots”, that is a perfect fit for what we want to accomplish here. We simply swap out the events that we will bind to (forward, backward, left, right), enter the name of our pusher channel(hexbot), api key, etc. (See code at the end of this post) We also borrow the pulseIR() function from adafruit. We write a function for each of the four events that loops through the IR on/off sequence. I have it set to loop 15 times, which results in just under a second of movement each time a button is pressed.
Even without setting up the server side to send commands, you can test your sketch by using Pusher’s “event creator”.
Server Side
Pusher has some great tutorials for getting started with sending events from your server. I created 4 separate PHP scritps, one for each event(forward, backward, left, right). These scripts each call pusher.php, passing the channel, event name, and message (we aren’t using the message part of pusher events for this project). The api key, secret, and app ID are saved in pusher.php, which does its thing and sends a secure trigger to Pusher.com.
trigger('hexbot', 'forward', 'hello'); ?> |
To call each of these scripts, we create index.html with 4 simple AJAX buttons. I added onthis example.
The last step is to add a webcam. Unfortunately, this requires port forwarding and dynamic DNS, things we were so happy to avoid by using Pusher to control our Arduino instead of running a webserver on the device. The coolness of being able to watch the robot move when you click the buttons justifies the extra configuration steps. I chose yawcam, a free Windows webcam server that has served me well in the past. Yawcam comes with some examples of embedded viewers. I just grabbed one, swapped out the domain name, and pasted the embed code into my pusher control page. That’s it!
After having the working demo up for a few hours, it appeared that the hexbot would go to sleep after some period of inactivity, requiring a manual flip of the on off switch to get it working again. I added some code that fires the left() function every couple of minutes if there hasn’t been any activity. So far it’s been working.
What’s next? I hope to be able to develop the backend a bit more, creating a simple messageboard for people to leave their nickname and a comment on. I’d also love to set up a queue that gives a user 45 seconds of control while others are waiting (I have no idea how to set this up, so advice is appreciated).
I’d also like to get a few more hexbugs and create a playground of sorts… we could even get them to play soccer or something.
Leave a Reply